Anchors Away
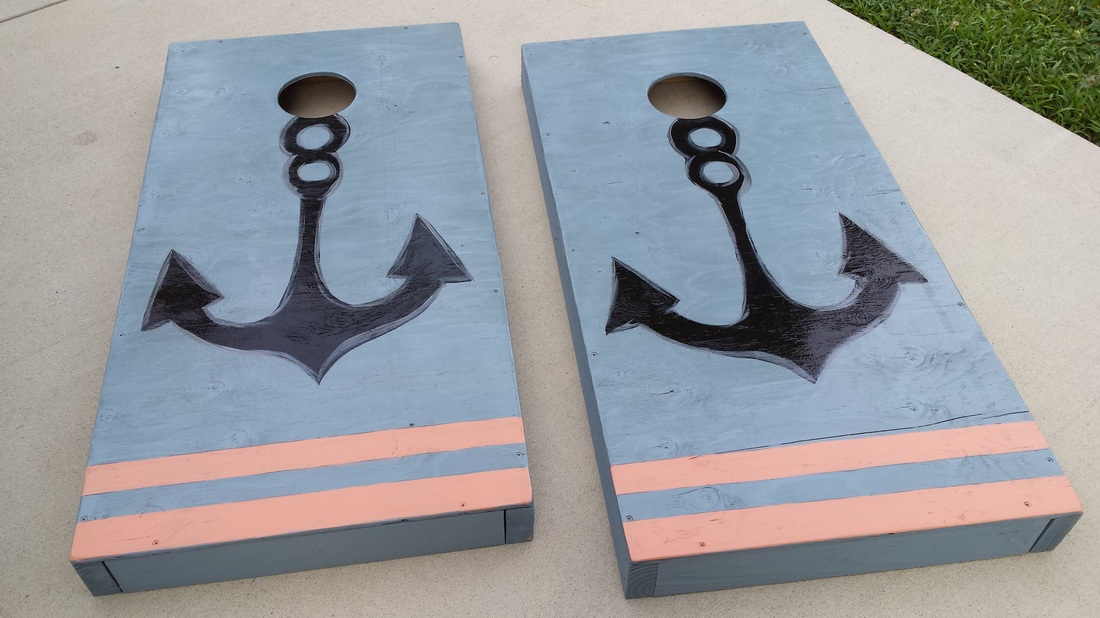
Steve built a few 'yard toys' this summer, including this corn hole set. Made from pressure treated lumber, I gave it a nautical paint job.
Pool Splash
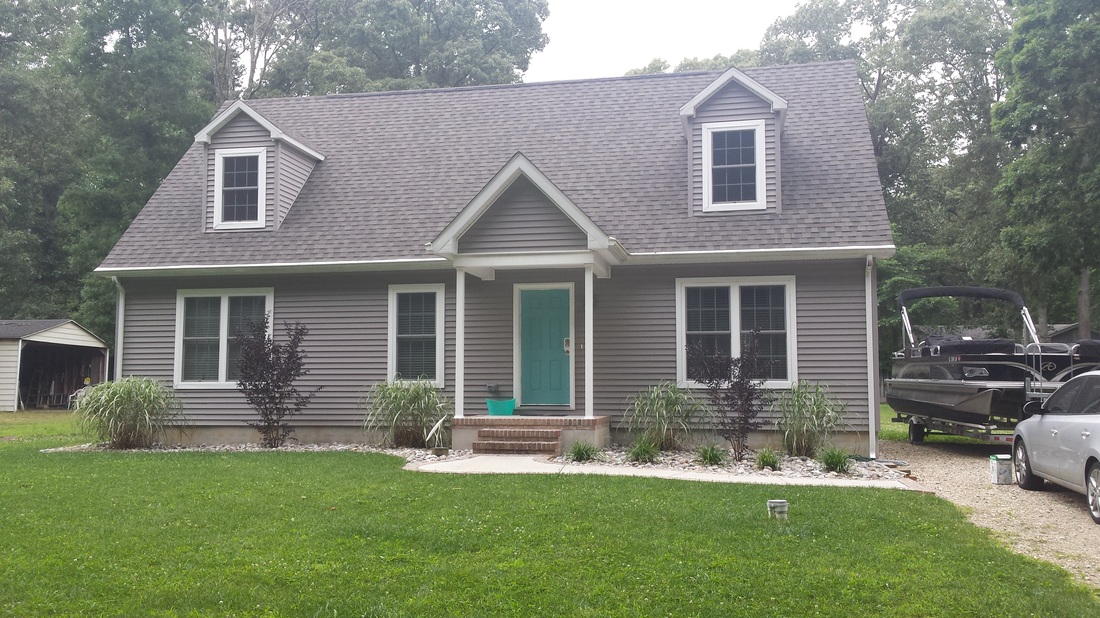
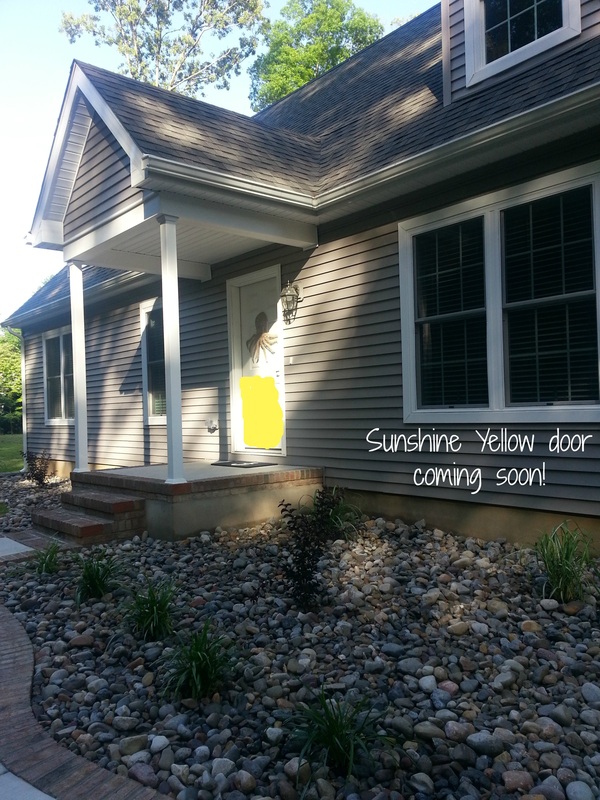
New front door color! Originally I thought we would go with yellow. Then I teetered on an orange color, finally landing on this aqua blue.
Another Solar Light project
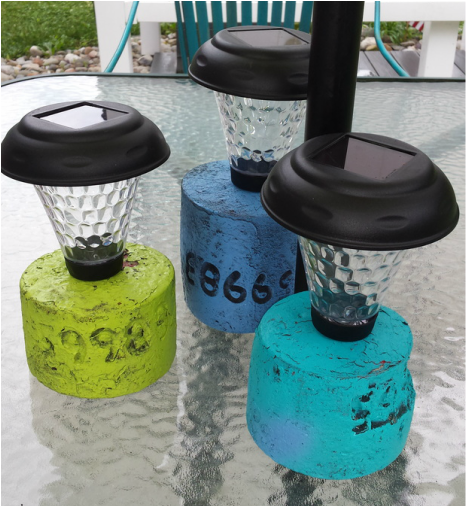
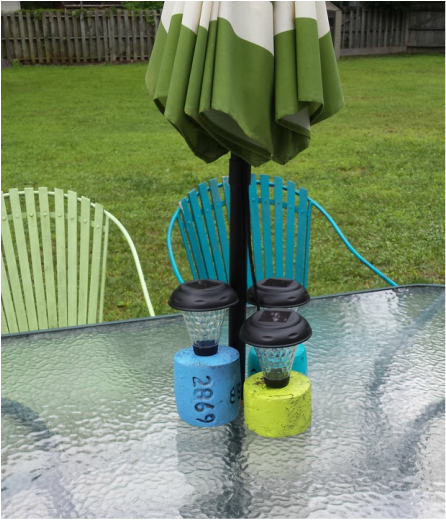
What do vintage buoys and solar lights have in common? A new home on Shady Lane.
I scored three vintage buoys from a thrift store in Delaware. They were the perfect colors for our coastal patio. Simply place three solar lights in the tops and you have a fun & functional nautical table top piece.
I scored three vintage buoys from a thrift store in Delaware. They were the perfect colors for our coastal patio. Simply place three solar lights in the tops and you have a fun & functional nautical table top piece.
|
|
The Skinny Diet
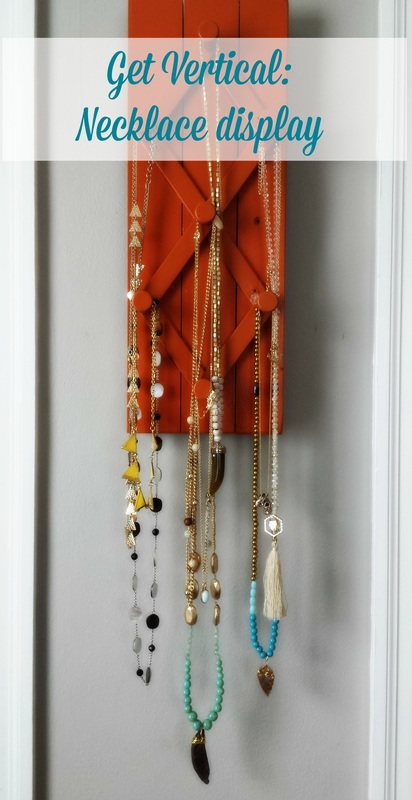
You've heard about the Skinny Diet, right? Wear a long necklace . . . look ten pounds thinner? The skinny diet! Well, that is at least what one lovely lady recently told a group of us attending one of those in-home jewelry parties.
I am a sucker for long and unique necklaces. However, they were piling up on my dresser into an unsightly pile of chains and beads. In desperate need of storage, I thought about using a collection of door knobs, cabinet hardware, or even just different hooks. But, I wanted something different and inexpensive that I could create quickly.
Enter, the Vertical Necklace Display! It fits perfectly in the space between our bedroom closet doors and keeps my strands neat and tidy.
To create:
1. Baby got back: Showing my age here, but you need a back. I used an old hinged door from a TV cabinet we scrapped. You could use: kitchen cabinet door, pallet wood, salvaged wood, cookie sheet, etc. Really, anything that is going to give you about 8" across will work.
2. In addition to the back, you need the 'hooks.' I used an expandable hook I found at the Dollar Tree. Yes, The Dollar Tree (another favorite store of mine).
3. A can of spray paint, one that specifically includes plastic. We opted for orange to match our decor.
To assemble: I screwed the expandable hook onto the backing, in my case the old wood cabinet. Then I carefully applied spray paint. Once dry, I added two screws and picture hanging wire to the back.
Tip: Add a Command velcro strip at the bottom to keep it centered and squared. Especially if you will be adding and removing your necklaces often. I use those things on everything! Crooked pictures make me crazy.
If this inspires you to create a vertical necklace storage piece, please let me know! I would love to see your beautiful work!
|
|

|
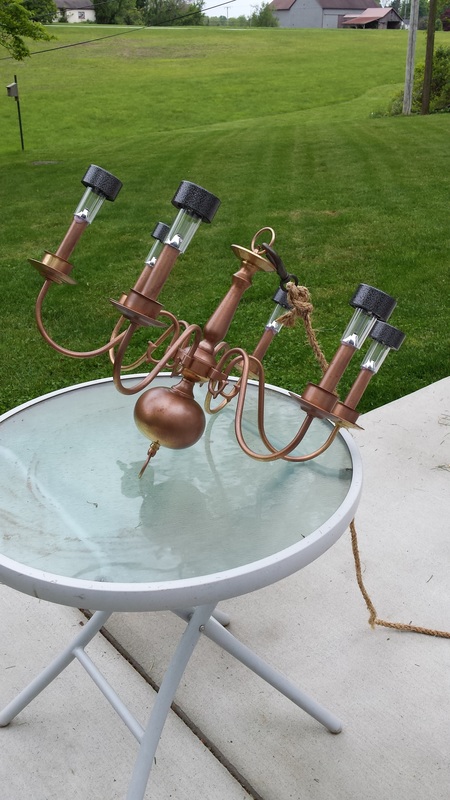
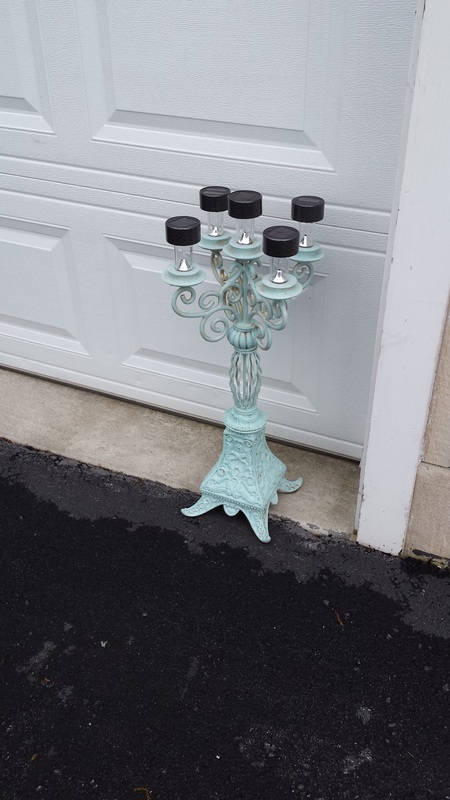
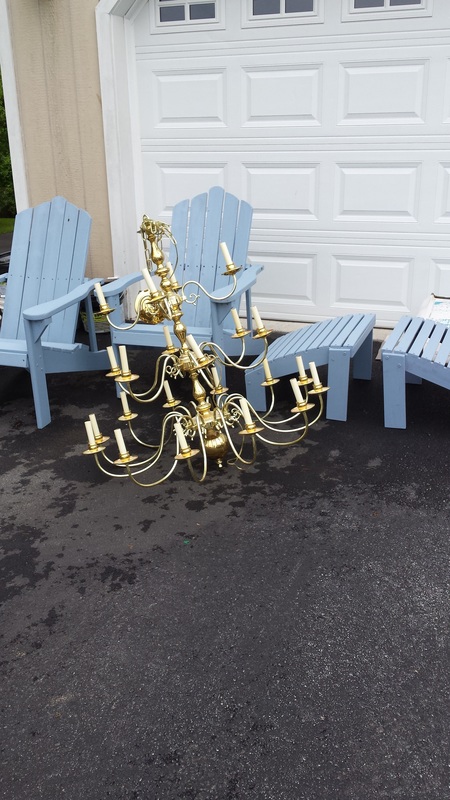
Solar Light Projects
My latest obsession involves searching yard sales and thrift stores for unwanted chandeliers. After a removing the inner parts and applying a coat of paint, I attach some solar lights. They create a beautiful ambiance in our backyard year round.
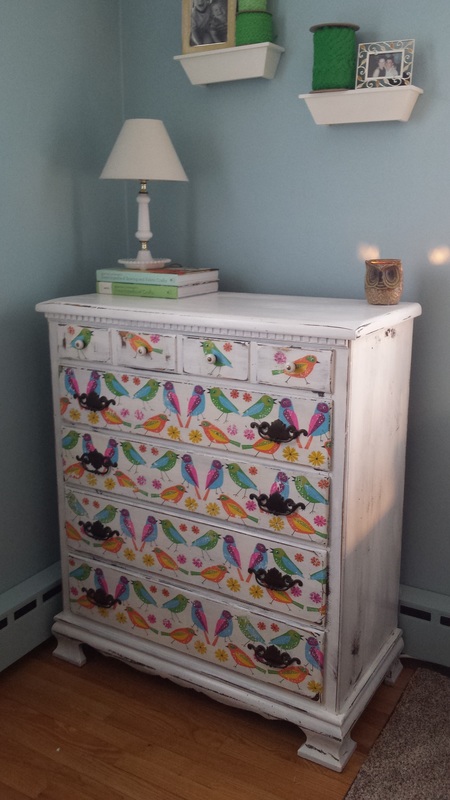
Serviettes en Papier
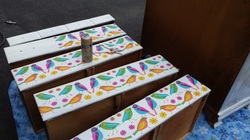
After seeing this technique from a pin on Pinterest, I decided to give it a try. I opted for a painted background, looking for a fun and bright piece to add to the sewing room.
The process was a bit messy, however I am thrilled with my 'tweet' dresser!
I look forward to utilizing this technique to complete a piece or two for the beach.
The process was a bit messy, however I am thrilled with my 'tweet' dresser!
I look forward to utilizing this technique to complete a piece or two for the beach.
The Finishing Touches
We are in the final stages of the upstairs remodel, paying special attention to details. The space is new and fresh, and most importantly being used quite frequently by the boys to 'hang out.'
Steve did a remarkable job on this remodel. We are beyond ecstatic with this dream realized.
Steve did a remarkable job on this remodel. We are beyond ecstatic with this dream realized.
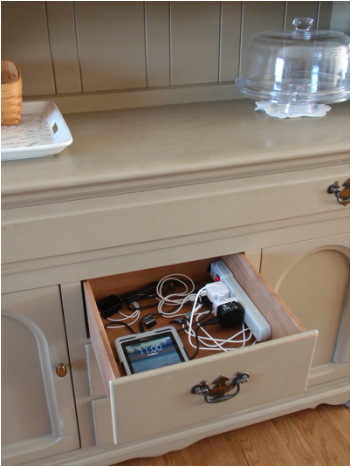
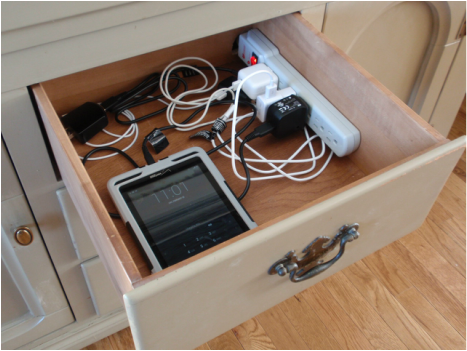
Quick Hutch Conversion Creates Charging Station
|
|
Tired of all those device cords laying around? Yes, we were too! So, handy hubs was able to convert one of the drawers in a thrift store hutch to a charging station.
In order to make this work, he took a power strip and determined what size hole would need to be cut out of the back of the hutch to get the plug to fit through. Once he determined the size, he grabbed his drill with a large circle bit (I am sure there is another name for it, but I don't know, so a bit that makes circles). He also had to cut a hole in the back of the drawer to accommodate the same cord. Once the cuts were made, he was able to feed the cord through the hutch and out the back to where it could be plugged in.
Lastly, he mounted the power strip to the side of the drawer.
Now if only we could get our kids to plug their devices in the drawer!
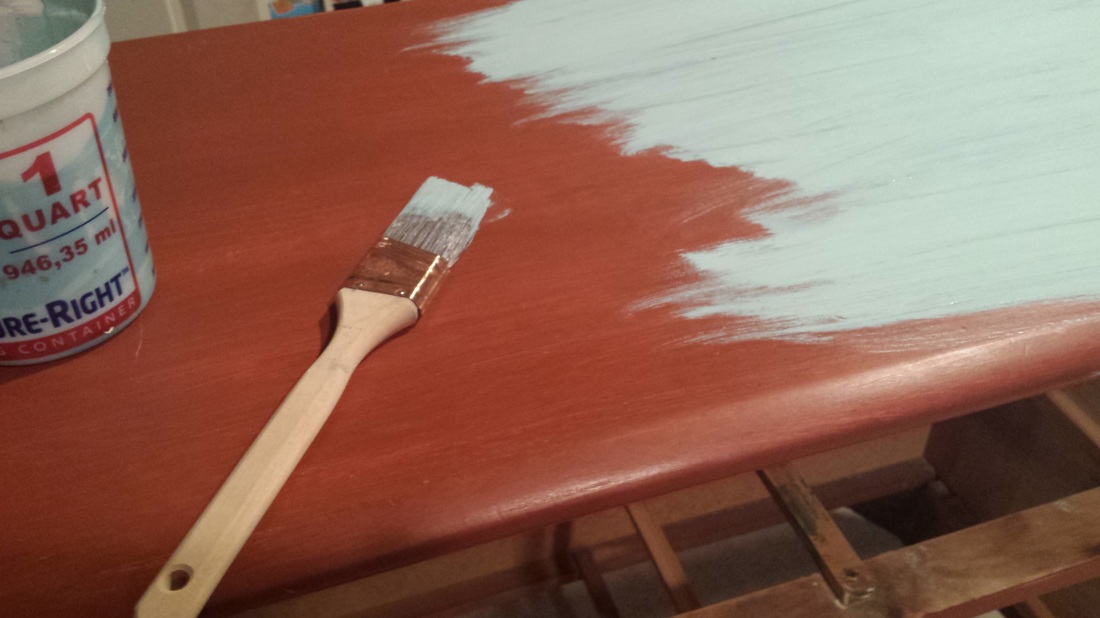
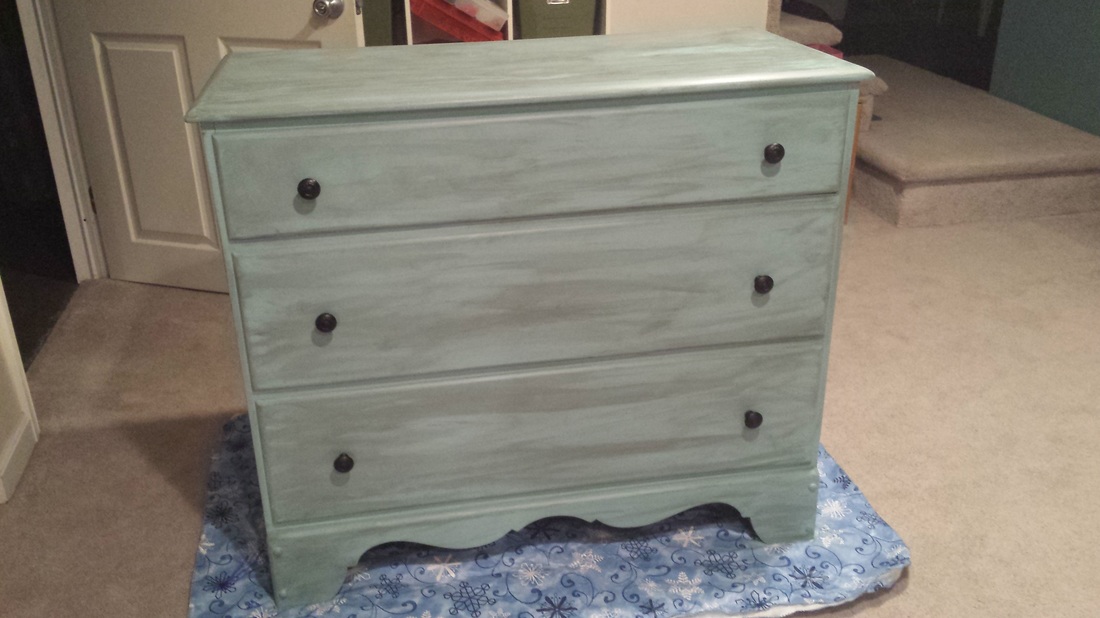
From white to red to blue
As an infant, this dresser stood strong and steady in my nursery. It was painted white and held my ruffles & polka dots for years. As a new mother, I painted the solid wood piece to match William's nursery. It was a rusty red color with a distressed finish. Today, it takes on another life as it is finished in a jade blue color with a steel glaze finish. Ready to make entry into Benjamin's new room, where it will continue the tradition of containing contents of yet another young child.
|
|
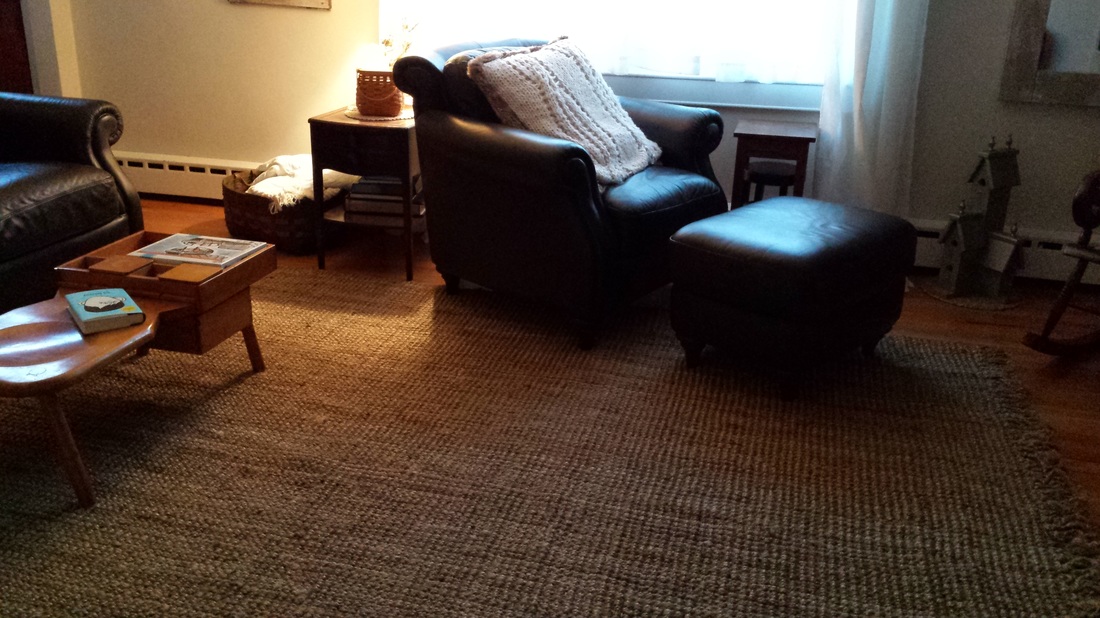
Goodwill Find
A late night run to our local Goodwill paid off! I was able to get this brand new (salvage from Target) 9 x 11 rug for $19.99. Score! It is a nice addition to our family room, adding texture and some coziness to our home.
Kennett Remodel
In 2004, Steve and I purchased our home on School House Lane. We dreamed of the projects that lied ahead and the potential our home had. A month into our new home, we found out we were pregnant. New house, new baby!
Throughout the years, we have made significant improvements to our home. However, after having our boys, we vowed to remodel the upstairs by the time William was ten. William turned eleven in January and we are nearly finished. This project has been underway since July 2015. It has taken much longer than expected, but is a true labor of love that we couldn't be more proud of.
Removing the old paneling and carpet was an improvement in and of itself. We gave the attic a bit of 'breathing room' since the previous insulation had been smashed against the roof. No wonder it was so hot in the summer! Our house was struggling to breath.
We updated the fixtures in the bathroom and installed a tile floor. In addition, we and added drywall to the entire upstairs and gave it a fresh coat of paint - Essential Shade, by Sherwin Williams. I love the color, a true gray - not too blue, not too yellow.
Move in day is coming soon! I don't know if I am more excited for the boys to have their new upstairs complete or for us to have our house back in order!
Shady Lane Guest Quarters
After two seasons of spending nearly every weekend with family and friends visiting Shady Lane, we are beginning the process of completing 'the guest quarters.' When finished, it will feature two bedrooms and a full bath.
My creative mind has already got me planning the decor in each of the bedrooms, focusing on unique headboards and flooring.
What is most enticing is the notion of being able to host our family and friends comfortably! One of my most cherished quotes is, "In a family, LOVE is spelled TIME." Perhaps I will find a little nook in the new space to create an art piece that captures that sentiment.
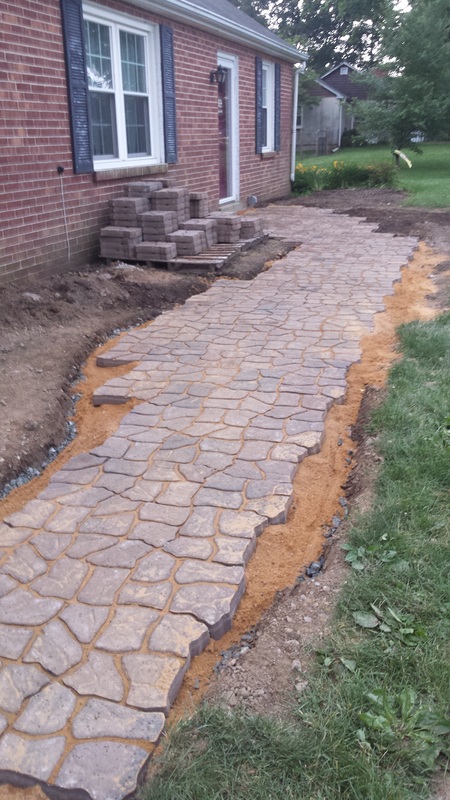
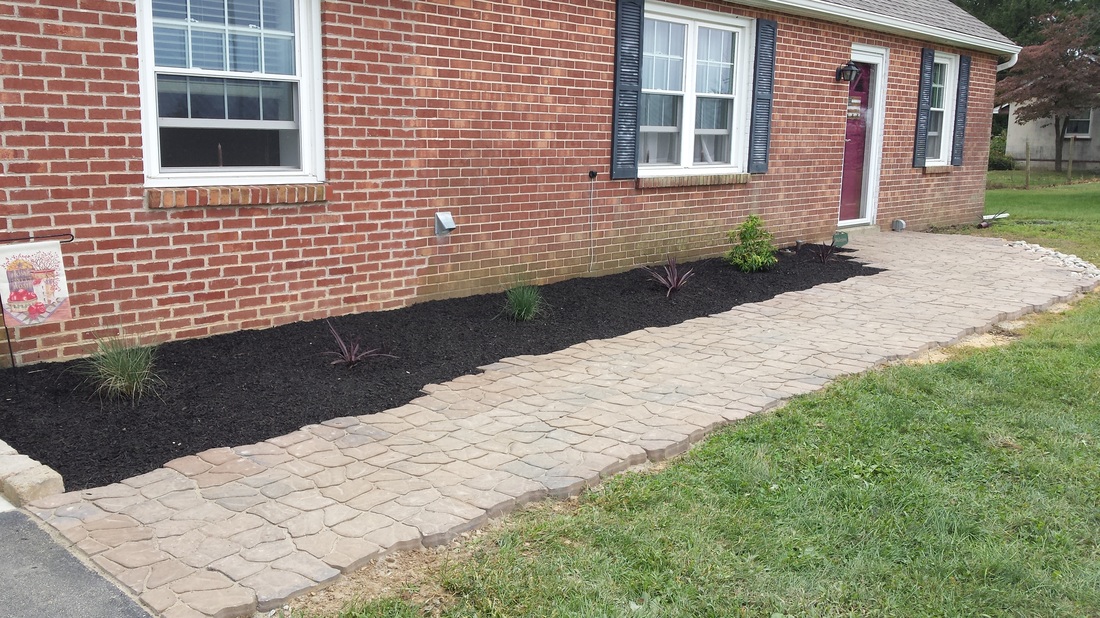
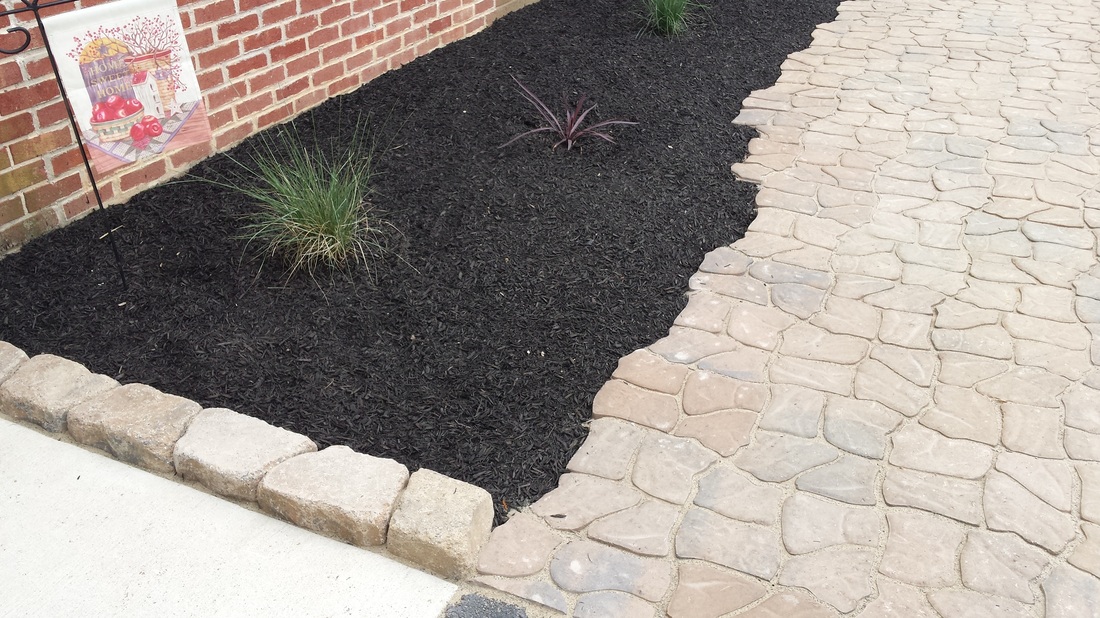
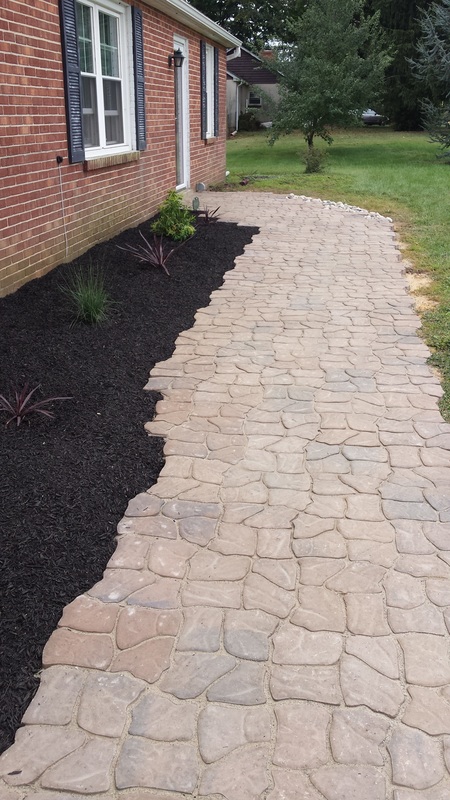
Walkway in Kennett
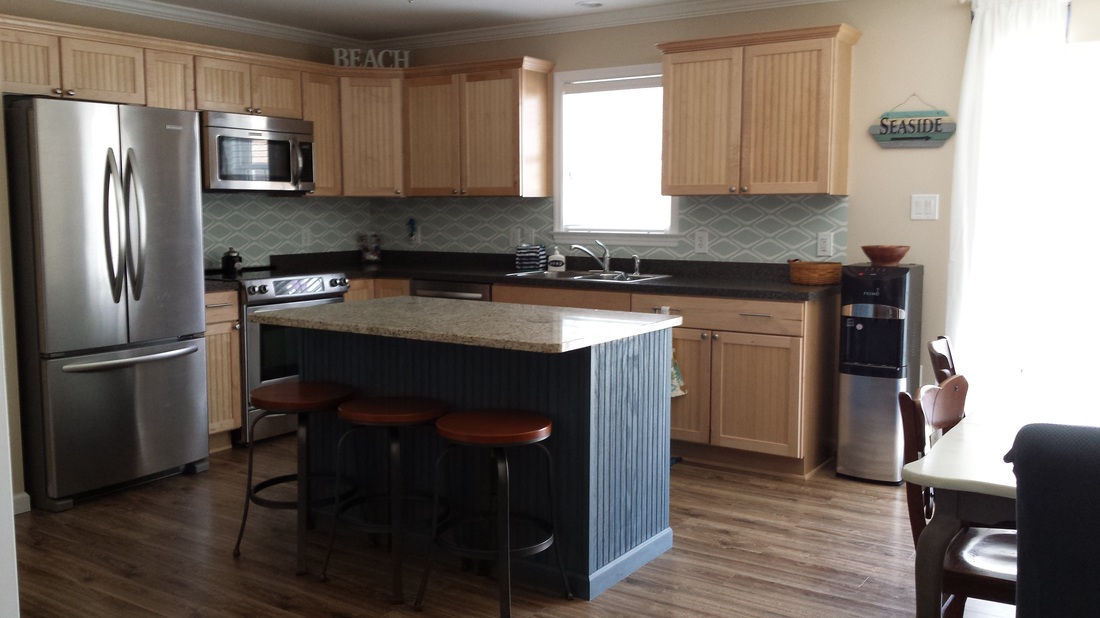
3.21.2015 Back Splash Shady Lane
We have been wanting to do some sort of a back splash at our beach house to help preserve the walls and keep it 'clean' looking.' The painted wall behind the cook top was beginning to look like a battle zone.
We found a nice vinyl paper to use temporarily.
The pros: easy to wipe clean, keeps the kitchen looking cleaner, adds a bit of color/coastal decor, temporary, inexpensive, and relatively easy to put up.
The cons: temporary - not sure how long it will last/hold up.
In the future, we hope to replace the counter tops with soap stone and do a tile back splash. Therefore, we didn't want to invest too much time and money into this project.
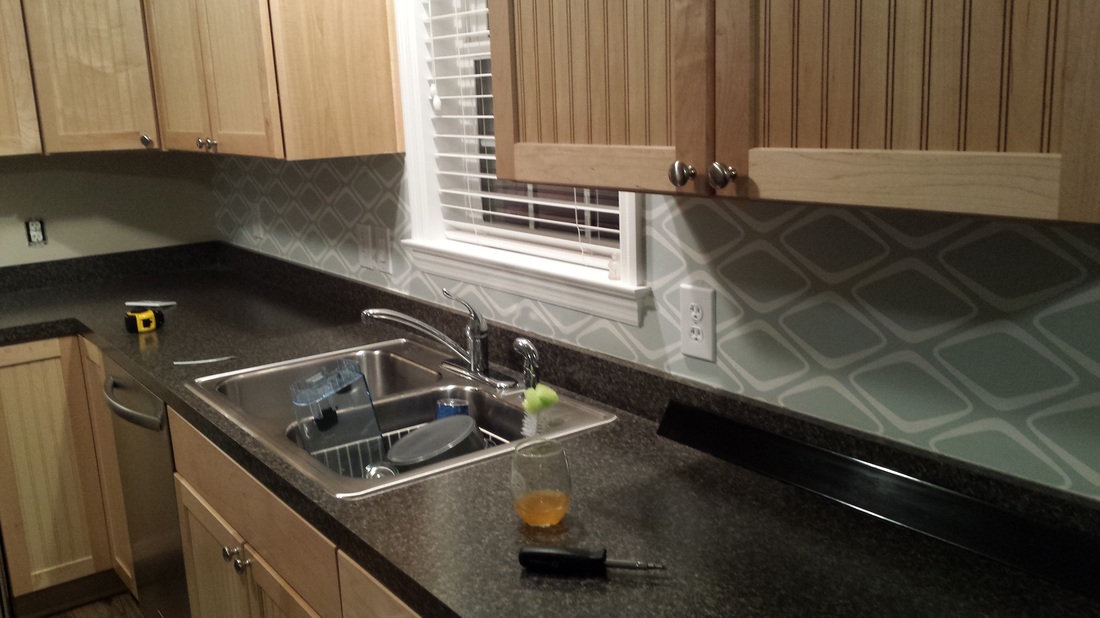
No project is complete without a little beverage!

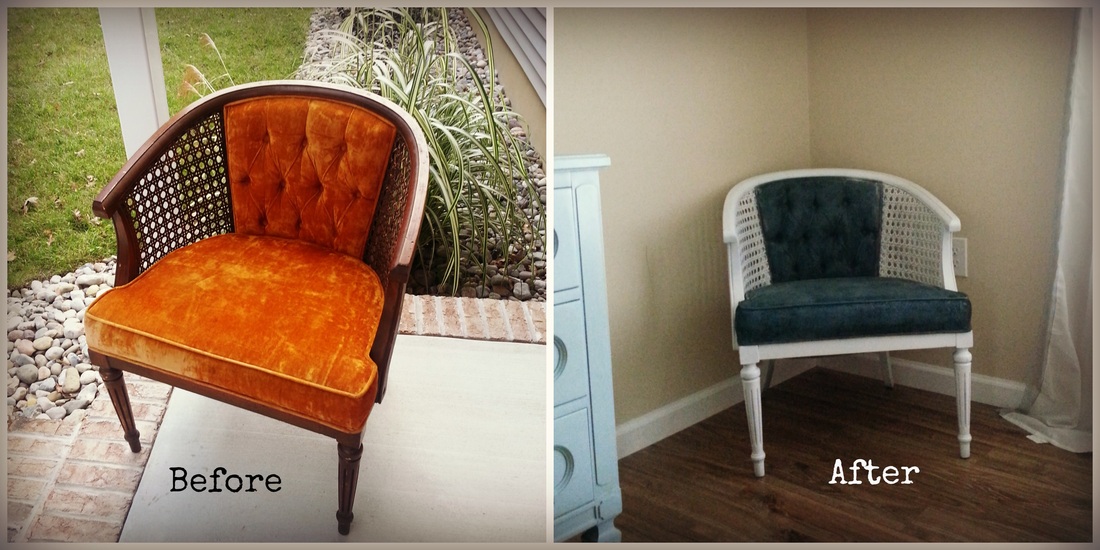
10.4.2014 Paint a Chair
I had purchased this little crushed velvet treasure at a yard sale. We have been wanting a chair for our bedroom to set a bag or clothing on. It needed to be 'revived,' however I didn't have the time or patience to reupholster the entire chair. Mainly because it was a tricky recover- not just a simple take the seat cushion off, wrap in new fabric, and reattach.
Therefore, I painted it. Fabric included! It is a bit 'crunchy,' but our bags & clothes don't mind. Quick & inexpensive fix!
Therefore, I painted it. Fabric included! It is a bit 'crunchy,' but our bags & clothes don't mind. Quick & inexpensive fix!
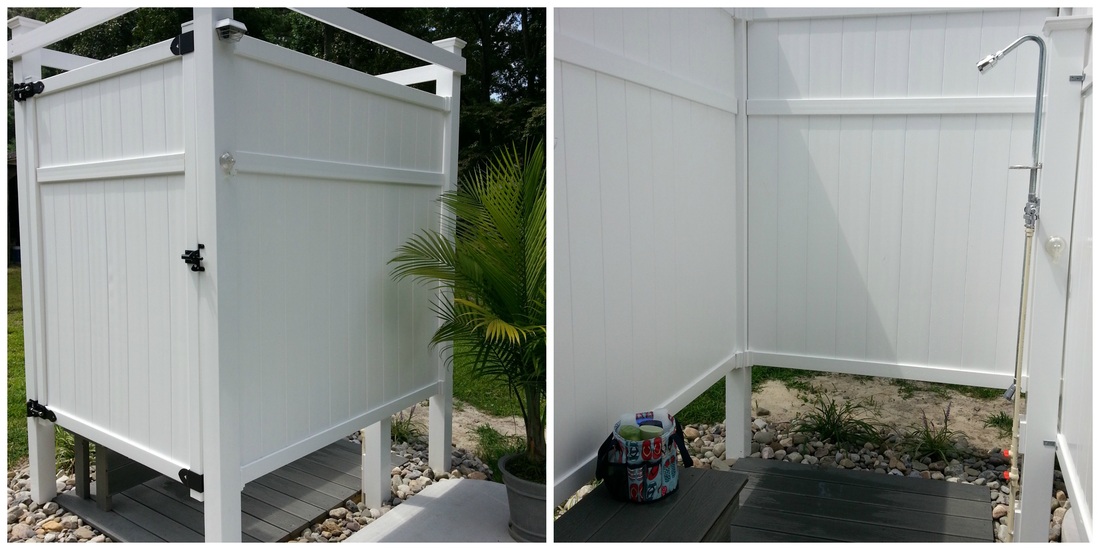
8.15.2014 Shower Update
We have been enjoying our outdoor shower since mid July. It has been a great help in keeping the sand out of the house. There is no greater feeling than coming back from the beach and enjoying a nice hot shower with a cool breeze at your feet.
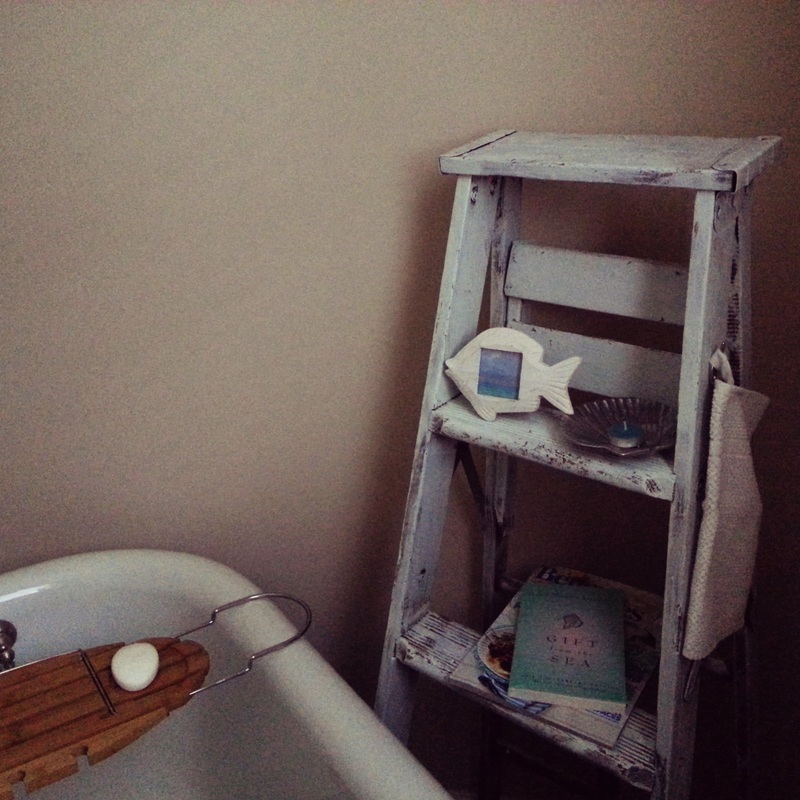
8.1.2014 Ladder Decor
Since building Shady Lane, I have envisioned a ladder type rack behind the claw foot in our Master bathroom. Well, I finally found it! Patience pays off . . . $12.50 from REstore in Kennett. It is perfect and exactly what I was looking for. After a quick dry brushing of a light minty green paint, I added two little nautical cleats on either side of the ladder to hang hand towels/wash cloths.
6.30.2014 Birthday Shower
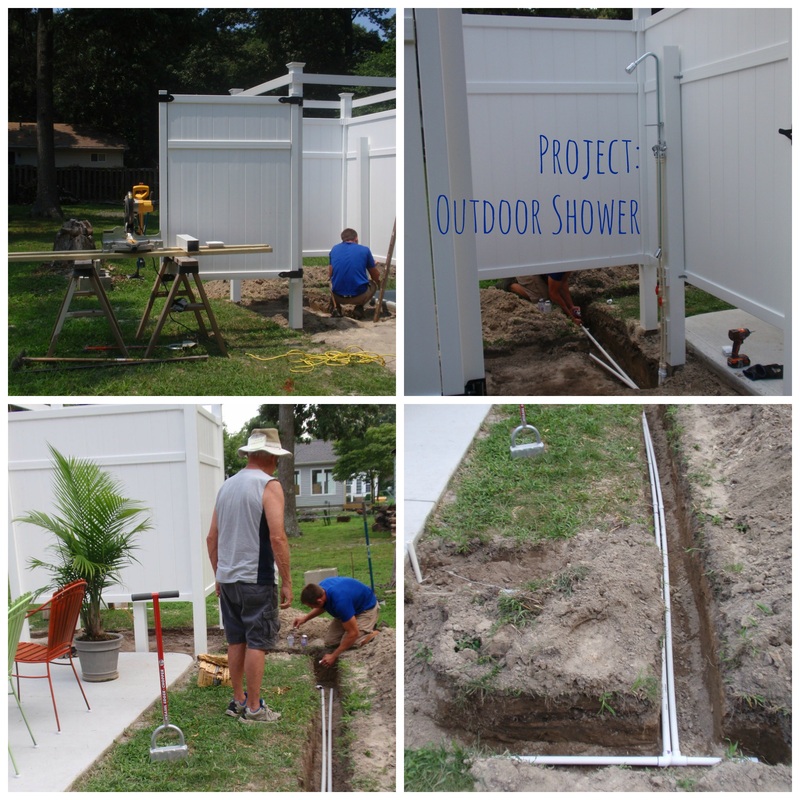
I turned thirty-seven years old on June 30th, 2014. Craptastic! I am getting old. When asked what I wanted for my birthday, I indicated that an outdoor shower would be wonderful. There is nothing more refreshing than showering outside. In addition, with the boys and Sydney, it will make life much easier when it comes to cleaning Shady Lane.
We considered the following options:
1. Hire someone to install & plumb. Uh, no. Too frugal, so not really an option.
2. Purchase a kit & build it ourselves. While we considered this option, the kits seemed a bit flimsy and small. We wanted the shower large enough for two people and a changing area. Our shower was going to be freestanding so we needed something solid to withstand heavy usage and heavy winds. Oh, and then there was the price point issue of said kits.
3. Purchase privacy fencing, gate kit, and plumbing materials and become ultimate DIY'ers in an effort to conquer Project: Outdoor shower!
We went with option 3. Lots of planning, researching, blood, sweat (surprisingly no tears) went into this little project. All that is left is the decking over the drainage area and the addition of a few comforts.
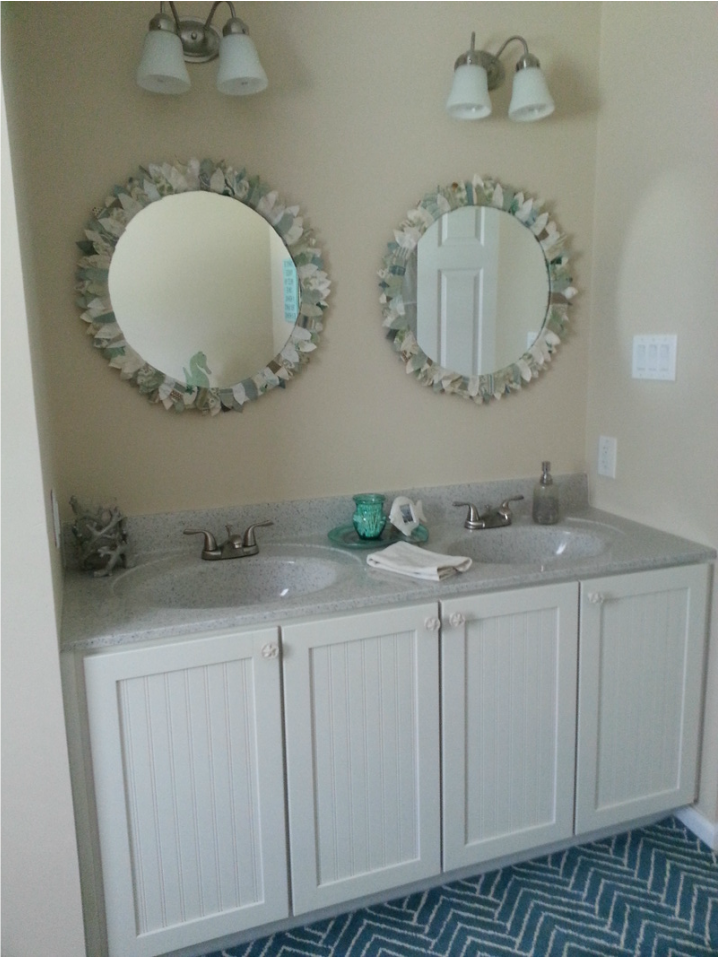
6.22.2014 Master Bathroom Mirrors
After months of debating, we finally have mirrors in our master bathroom. I was originally thinking portholes-turned mirrors, but I haven't had time to travel to Annapolis to try and scoop some up at a marine salvage store. I contemplated purchasing a pair {gasp}, but couldn't do it. I am frugal & thrifty, AKA 'Cheap Traci.'
Cost: Free :We used MDF we had on hand, mirrors from Steve's parents that they weren't using, and decorator fabrics given to us from one of Steve's customers. We even had the glass cut for free from one of his new customers. {thank you Kennett Glass}
Steve cut the MDF into circles and cut a hole in the centers to frame the mirror. He used a router to inlay the mirror on the backside.
I added the fabric feathers/scales on with glue.
We then fastened the mirrors in the back and strung some picture wire for easy hanging.
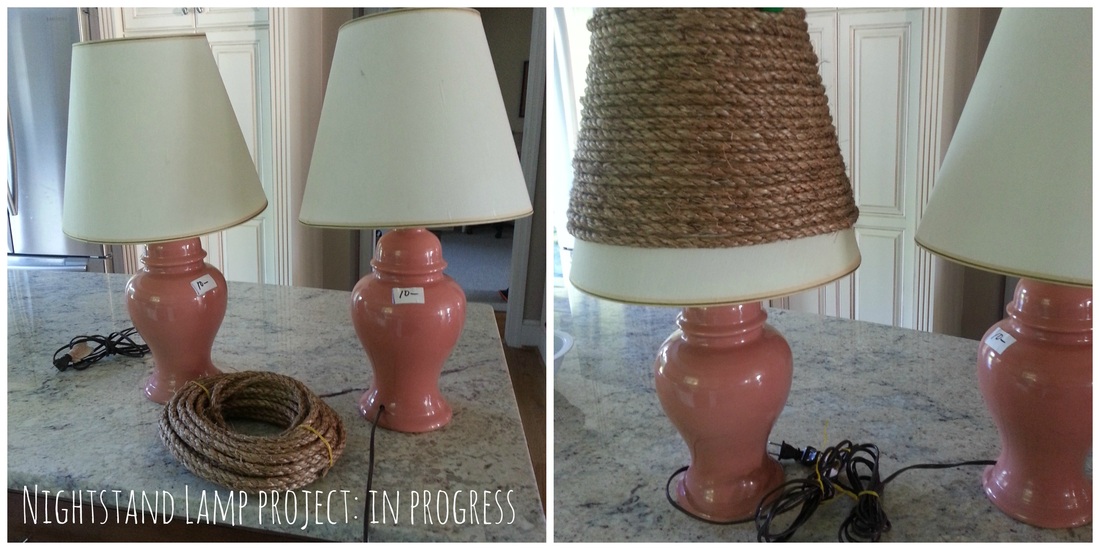
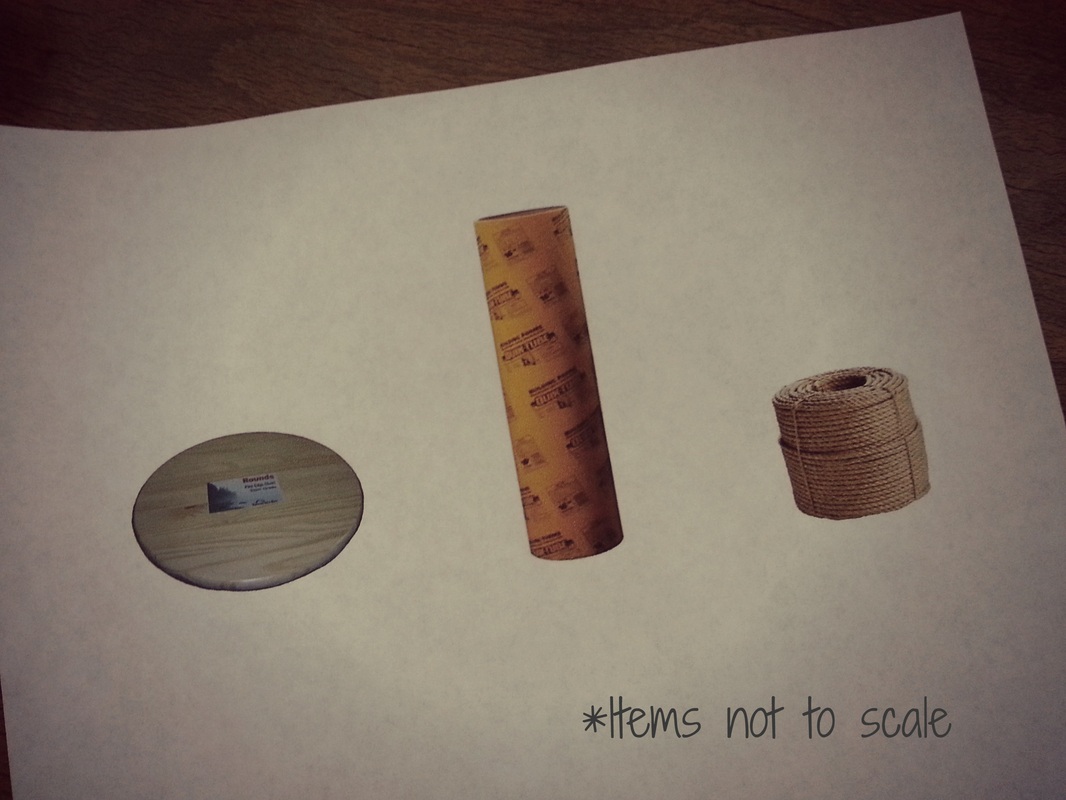
6.21.2014 Nightstand Lamp project
I scored these little beauties at the REStore in Kennett during their 50% off sale. The set cost $10.00 plus tax {shades included}. I circled them several times before scooping them up. Typically I prefer a wood lamp, but the scale of these seemed to fit the look I was going for. I am not even sure if I am keeping them the coral color or not; depends on how they look against our headboard. However, I am updating the shades by adding a bit of rope to keep with our nautical decor. *Actually a bunch of rope.
*Shown with 50ft of rope & it doesn't even cover one shade. Off to Ace Hardware. Stay tuned!
*Shown with 50ft of rope & it doesn't even cover one shade. Off to Ace Hardware. Stay tuned!
6.20.2014 Gratitude
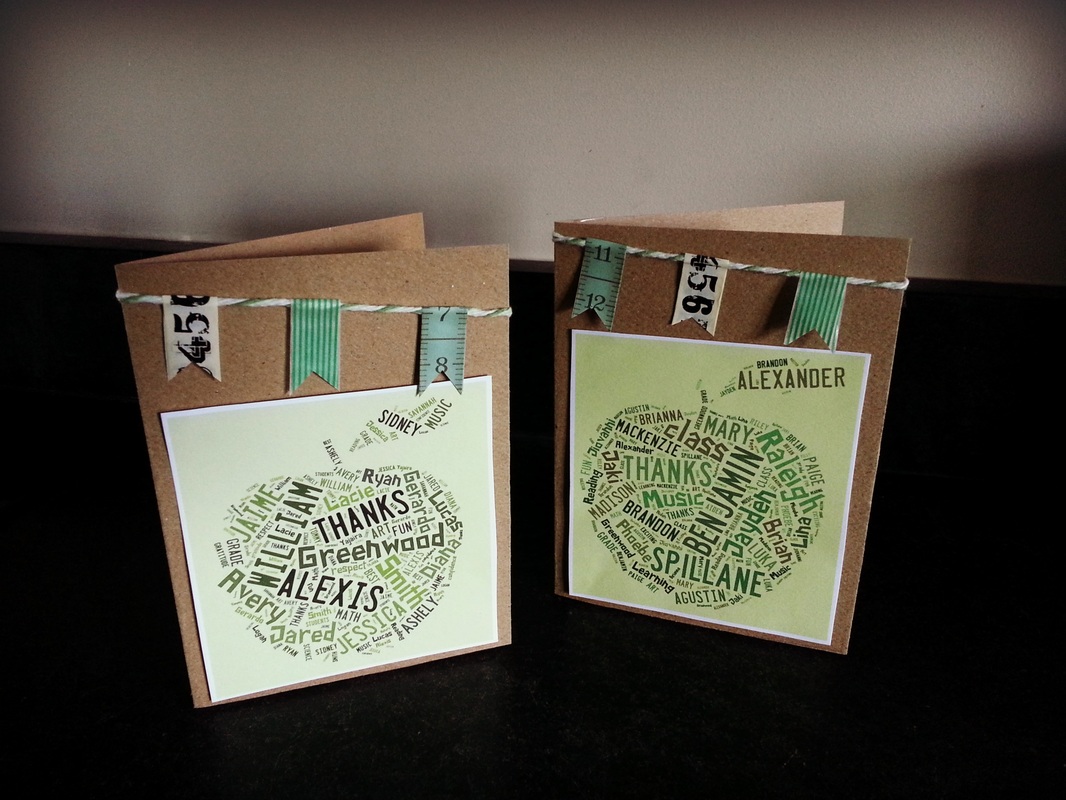
They boys last day of school was June 20, 2014. They are moving on up! We are very proud of their hard work and effort this year.
I always try to create a little something special to show my appreciation to their teachers. This year, no lie, I got behind. It was a huge adjustment working outside of the home for the first time in 8 years. Actually, I am still processing the last year as it was quite a whirlwind.
Nonetheless, these cards were a big hit! By using a graphic art program, cardstock, twine, and washi tape, I think the end result is perfect.
Paired with a gift card, it would be a gift I would certainly appreciate.
I am considering offering them for sale in the shop in the near future. . .
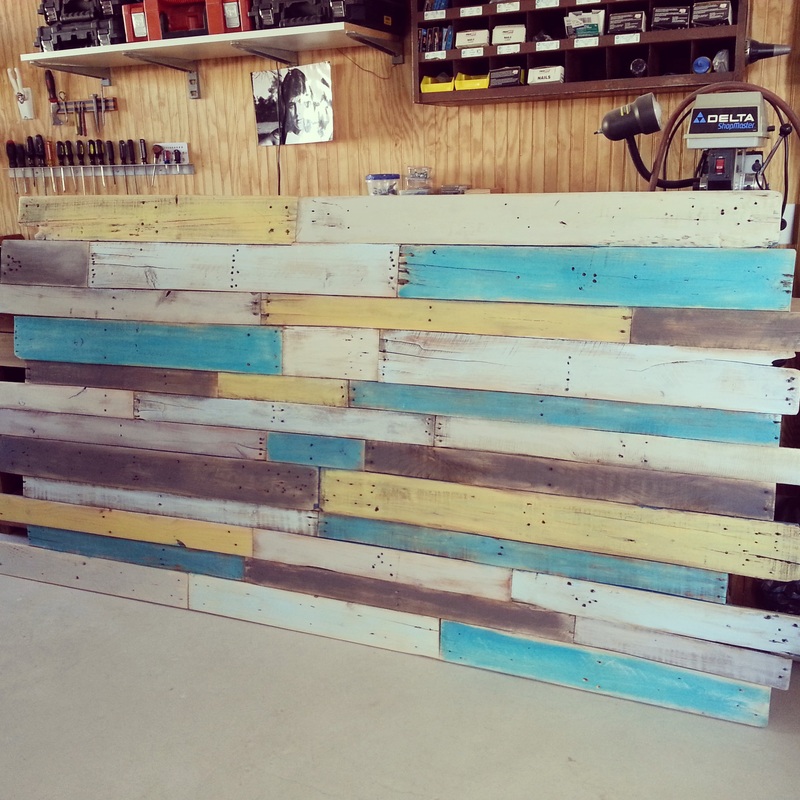
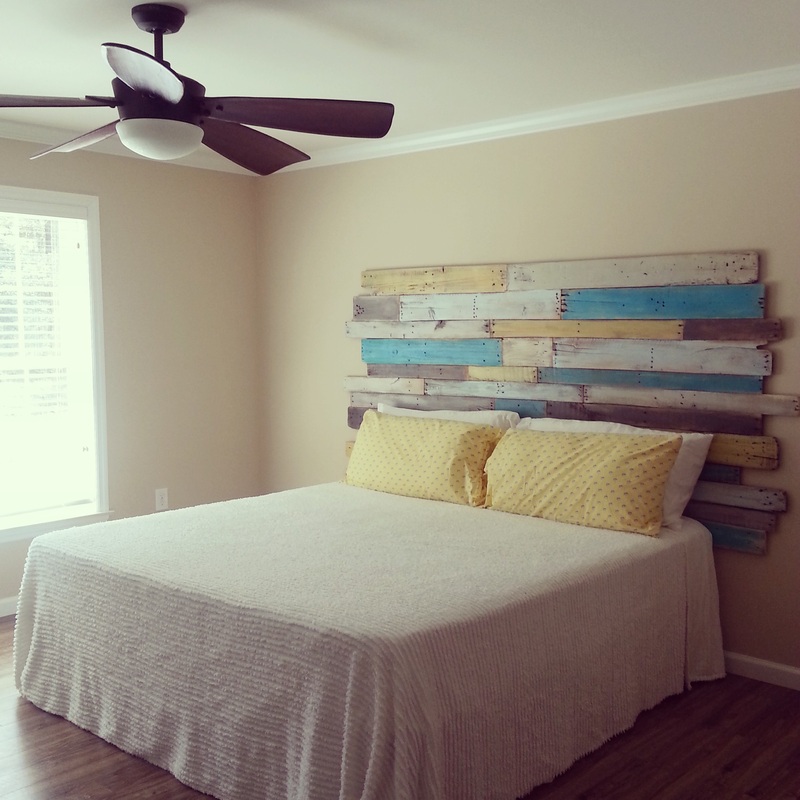
6.13.2014: coastal Pallet Headboard
One project we are pretty excited about is our headboard for Shady Lane. Steve did most of the construction. I had the fun part: painting! I should have taken pictures of the process, but was too excited to see my vision come together. This is what we did to create a custom, one of a kind, coastal headboard.
We started with some pallets we scored for free from local businesses. Steve worked tirelessly to get single planks of the pallet wood. There are several tricks of the trade, including a tool you can purchase and a way of cutting the pallets to eliminate the number of nails needing pulled. We like to do things the hard (cheap) way.
Due to the design we wanted, we needed a solid backing to attach the pallet wood. Steve used a piece of plywood that we had on hand. He cut the length of the plywood a bit shy of our actual mattress size. We left the height at the standard 4'.
Using varying pieces of the pallet wood, Steve and I laid out our pattern. I wanted the edges uneven; rustic & unpredictable. After laying out our pattern, we glued and screwed the boards in place. He used squared headed screws that were dark in color. The pallet wood extended past the plywood on all ends and a little at the top. Once in place, we used strips to fill in any spots that we could see the plywood. Fortunately, we didn't need too many. I didn't want to see the plywood behind the pallet wood.
We gave the beast a nice sanding and contemplated leaving it au'naturale. However, we have so much wood in the decor at Shady Lane, it didn't take long to determine we needed a splash of color.
Fun part {painting}: I constantly pick up the OOPS* paints at Lowes and Home Depot. I prefer the tiny sample pots or the quart size since I typically use them for smaller projects. Luckily, I have been scoring some coastal colors and had everything I needed on hand. *The OOPS paints are the cans of paint that were mixed but not purchased for whatever reason.
Using a very dry brush, I washed over each plank in hues of yellow, white, gray, and blue. We couldn't be happier with the end result. The project cost us virtually nothing since we used what we had on hand.
A true labor of love
We found a few studs and screwed the beast in place. What is a few more holes when dealing with pallet wood?
We are still working on decorating the rest of the house (MIA: night stands & lamps).
However, after a good nights sleep there is nothing like waking up and looking at this labor of love.
However, after a good nights sleep there is nothing like waking up and looking at this labor of love.
6.8.2014: Date Night
We were fortunate to have the boys spend some time with Grandma & Grandpa this past weekend {thank you}. Date night! In reality, this meant we tackled a laundry list of 'to do' items after two baseball games: attended a retirement party, built a shed, added a keypad deadbolt, and made this little ditty.
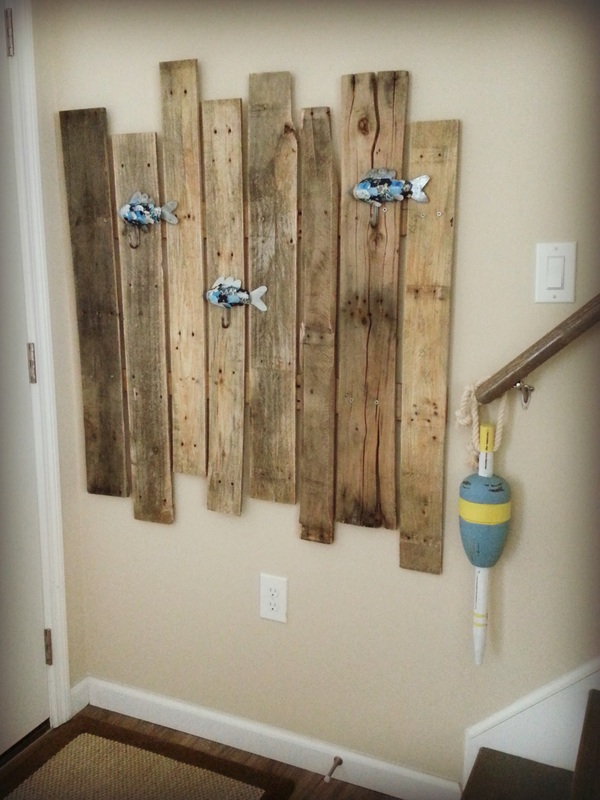
The bulk of the project took about 30 minutes to complete. I wanted a little background for the fish I created, so Steve took some pallet wood and mounted them to 2 cross beams. We finished by giving the piece a quick sanding to knock off any dirt & rough edges.
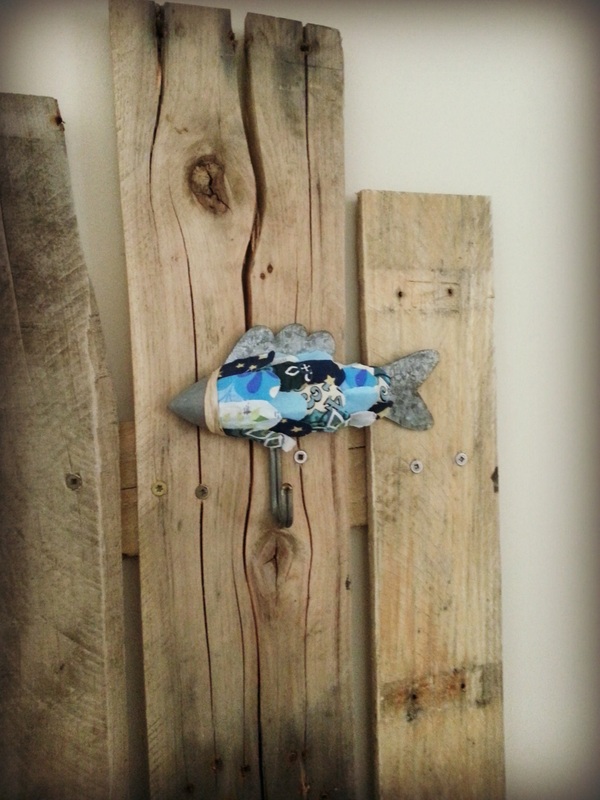
The little fish were created after finding some wood/metal fish with hooks at the thrift store. I paid $5.00 for the set of 3. They were brightly painted and really didn't suit our style, but I adored the combination of wood & metal. I knew I didn't want to paint them since I craved a bit more texture. Looking at the mounds of scrap fabric in my possession, I had an idea.
To create the unique look, I took similar colored fabrics and cut 'scales.' I used 5-6 patterns, all in hues of blue. I began gluing at the tail, creating a row on the body of the fish. A little more glue and raffia to cover the transition section, and we had a trio of fish worthy of some wall space.
To create the unique look, I took similar colored fabrics and cut 'scales.' I used 5-6 patterns, all in hues of blue. I began gluing at the tail, creating a row on the body of the fish. A little more glue and raffia to cover the transition section, and we had a trio of fish worthy of some wall space.
6.6.2014: upcoming project
What do these three things have in common? An upcoming project {if the hubs lets me}. Sometimes he just shakes his head at my ideas! Stay tuned . . .
River Rock Flower Beds
We spent the Memorial Day weekend shoveling river rock and planting some plants at Shady Lane. Let's be honest here: Steve and my brother spent their weekend shoveling river rock & planting plants. I had very little to do with it. Anyone that {truly} knows me realizes quickly that I do not have a green thumb. I don't swoon over flowers. I appreciate them and their natural beauty, but don't buy flowers 'just because.' Just not me. Luckily, Steve is a natural & my brother thrives in a garden bed. So, without further adieu, some updated pictures of our home on Shady Lane.
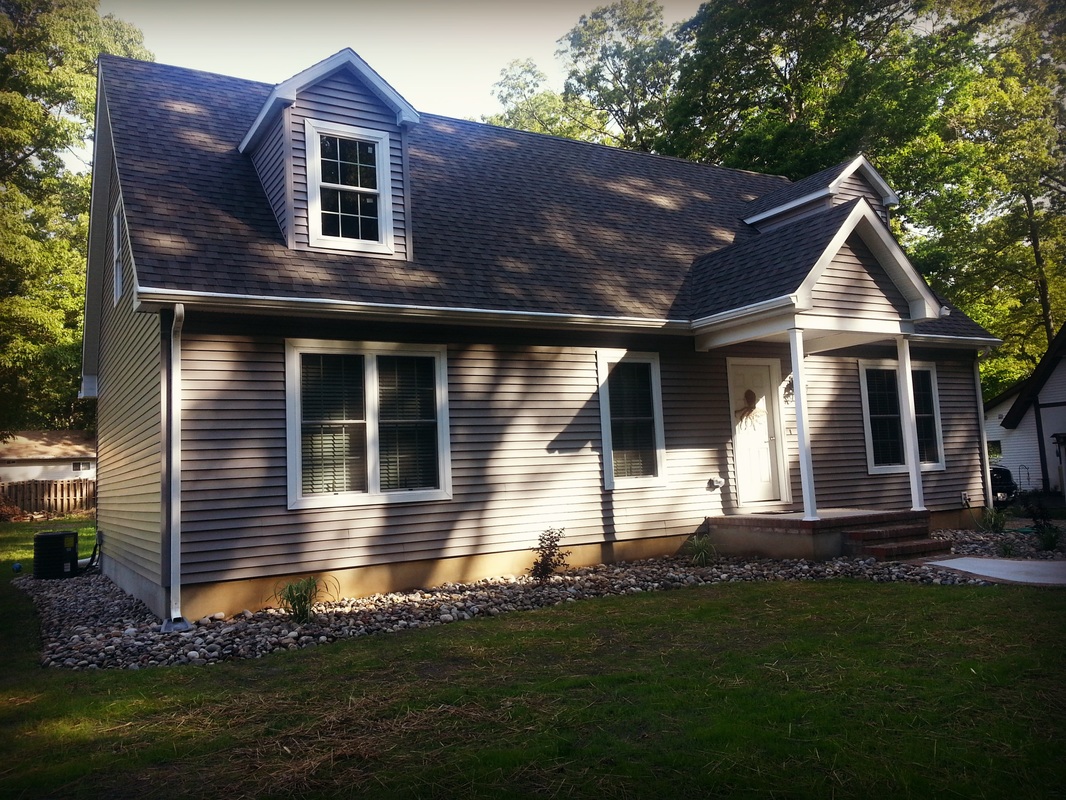
We opted for 2-5" River Rock. We liked the look of the stone and will appreciate the long lasting sustainability (as opposed to mulch).
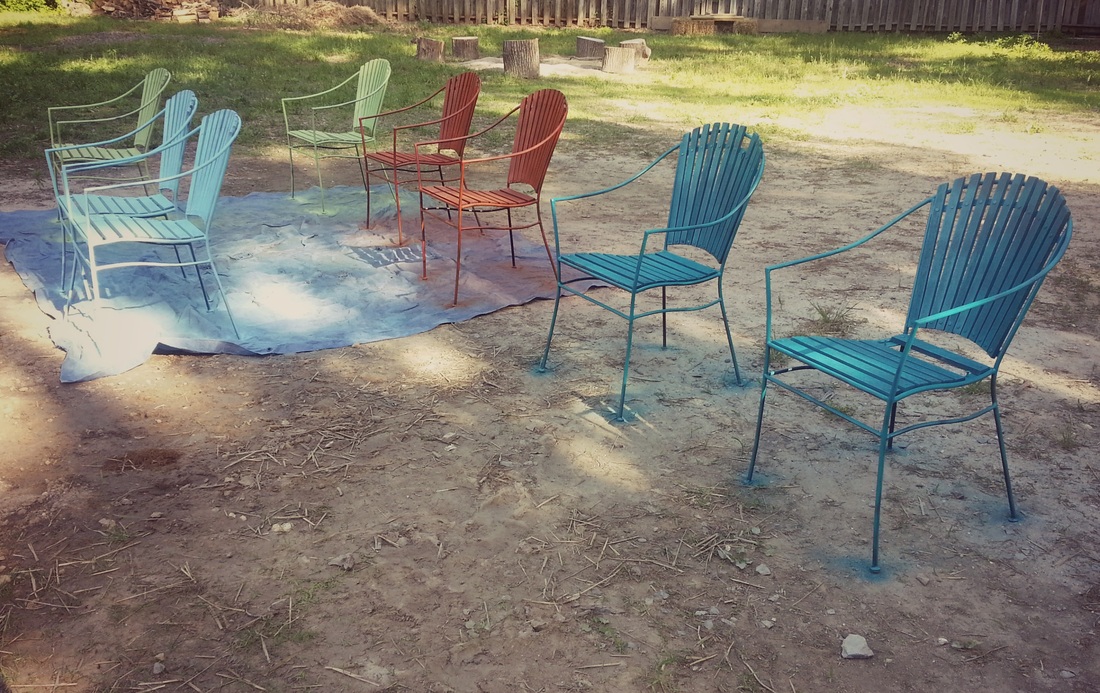
We also hit a few yard sales & went to Lowes. We scored these wood & metal chairs; 8 for $20.00. They aren't the greatest, but with a fresh coat of paint & some minor repairs, they will really spruce up the patio out back. Now we will have a place to sit {BONUS}
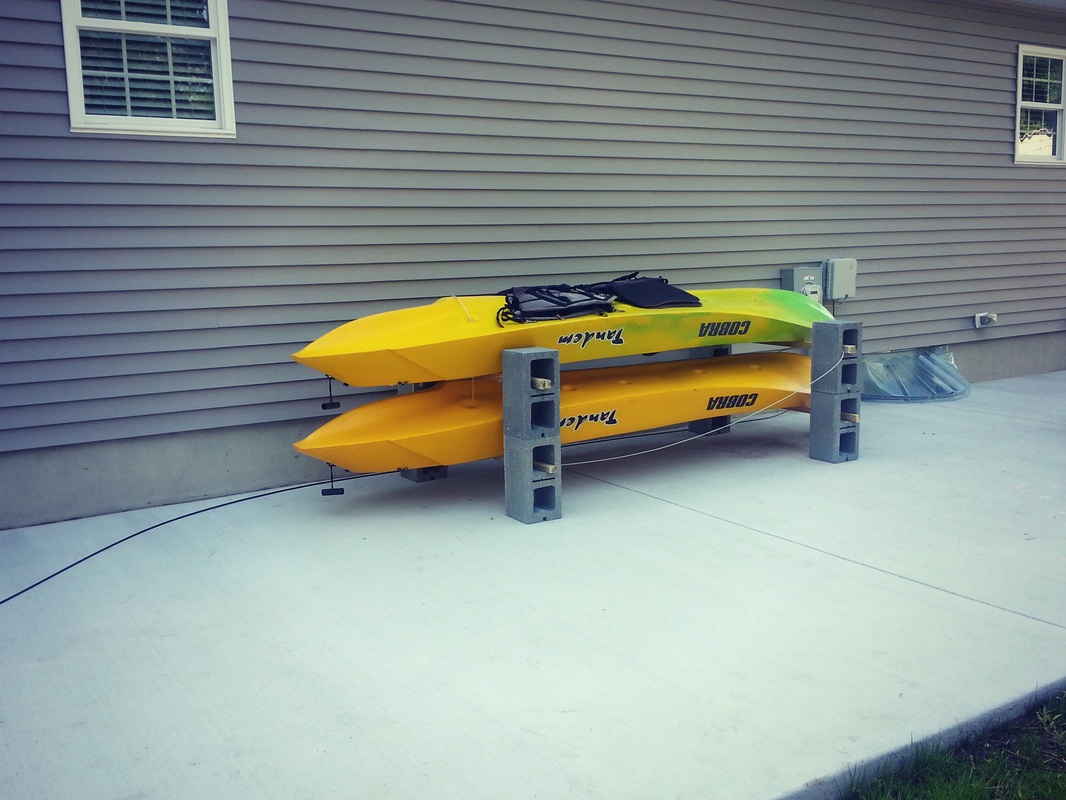
Lastly, we built some temporary storage for our kayaks. Steve & I navigating the stairs with them at the end of each weekend was not pretty. So, until we have a little shed and/or a big garage, they are on the patio secured by this little rack Steve built.